
MASK TUTORIAL FOR FAITH COMMUNITY CHURCH
In partnership with Net of Compassion – St. John’s Church in Worcester serves the homeless faithfully throughout the year. Join our mask-making brigade to supply 500 handmade masks to the shelter so it can welcome people in from the cold this winter and provide them an extra measure of safety and care. If you are unable to purchase materials, please contact Sheryl Sullivan [sheryl@faithma.org] for assistance.
The ‘pattern’ for this mask is quite simple; it’s more about having the correct materials to follow CDC guidelines & then following the step by step directions that is important. We’ve broken it down for you below if you prefer having printed directions with you as you sew OR If you prefer a video tutorial, here is one we recommend! VIDEO TUTORIAL
*the video and step by step directions below are VERY similar but there may be some slight differences. Material requirements are the same.
Materials
- 100% cotton fabric (with a tight weave)
- 1/8″ flat elastic for ear loops
- fabric scissors
- ruler
- pins or clips
- sewing machine and thread
STEP BY STEP
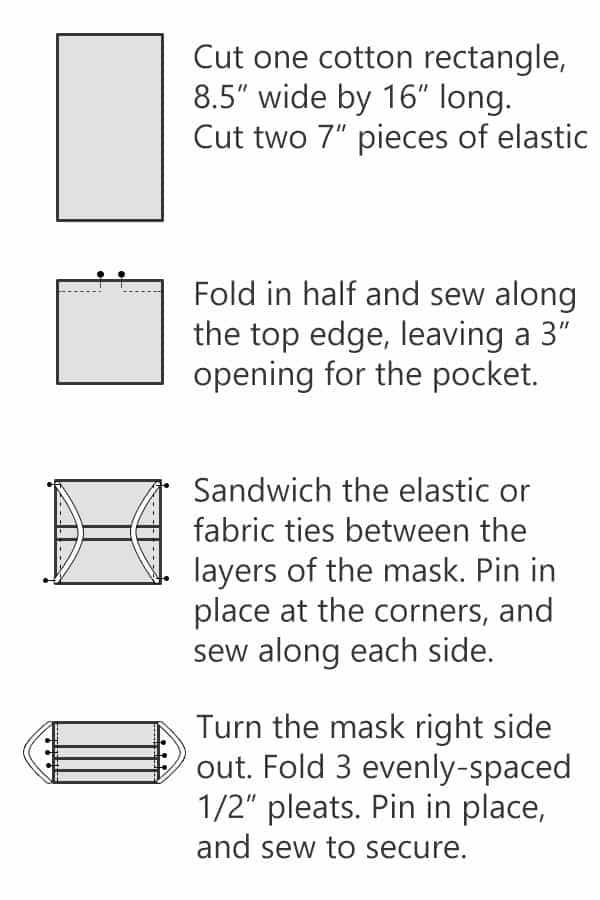
Step 1: Sew to the top side.
Fold the fabric in half, with the right sides facing each other. Sew along the 8.5″ width edge, using a 3/8″ seam allowance. Leave a 3” opening in the center of this seam to allow the mask to be turned right side out after sewing.
Step 2: Pin Elastic
Turn the fabric so that the seam with the pocket opening is centered in the middle of one side. Optionally, stitch to reinforce the seam: Press the seam open and topstitch or zig-zag stitch along both sides of the seam for a neater edge. Pin one piece of elastic to the top and bottom of the short sides of the fabric rectangle to create an ear loop. Place the ends of the elastic 1/2 “ from the top and bottom edge of the fabric. The length of the elastic will be sandwiched inside the two layers of fabric, so it will be on the outside when you turn the mask right side out.
Step 3: Sew the Sides
Sew the sides of the facemask. Backstitch over the elastic or fabric ties to secure them. Trim the corners with scissors. Turn the mask right side out and press with an iron. You can use a pencil to push out the corners.
Step 4: Make the Pleats
Create three evenly spaced 1/2” pleats. Pin the folds in place, and sew along the sides. Make sure all pleats are facing the same direction. The finished mask will be about 3.75″ tall. When the mask is worn, the pleats should open downwards to prevent any particles from collecting in the fold pockets.